Tuesday, October 22, 2019

My Bike of Broken Pieces

I've been rough on bike frames lately. Every cyclist occasionally "drops the chain." This happens as one is shifting in or out of the chain-rings. If the chain drops to the inside, it's rarely much of a problem except that the cyclist has to stop, put the chain back on, and wipe his greasy hands on some inconspicuous part (usually the butt) of his black cycling shorts. If the cyclist drops the chain to the outside, it's usually even less of a problem. Shifting down -- from the 50-tooth ring back down to the 34 -- and slowly turning the pedals almost always succeeds in "pedaling the chain back on." It's a trick all avid cyclists learn.

But it doesn't always work. In some cases the chain gets wrapped around or snagged in the rear cassette and trying to pedal it back on can result in a broken derailleur hanger. No big deal, right? Replaceable derailleur hangers are designed to break so that other parts of the bike (the frame, the rear mech, etc.) are protected. But things don't always go as intended. Three times in the past couple of years, I have broken my hanger and had to replace a variety of other parts. The last time, my chain got so tangled in the rear cassette that the wheel locked up at 20 mph, sending me into a long skid down the blacktop. Fortunately I kept the bike up, but I later measured the skid mark at over 20 feet!

That lock-up caused a broken derailleur hanger, seriously bent front and rear mechs, a chain bent in multiple places, and a cracked seat-stay on my carbon CR4. My initial reaction to all that damage was to declare the frame a total loss and to use the salvageable parts (shifters, handlebars, brakes, pedals, bar tape) to upgrade the components on my ancient Giant OCR3 (22 pounds when new in 2001, 20.5 after the upgrades).

With all the parts stripped from my CR4 crankset-frame-and-fork, I was able to appreciate how incredibly light it was. And I got to thinking. I've been making stuff with fiberglass for over 40 years -- most recently my CLC Shearwater Sport Sectional and my Northeaster Dory. How different could it be to repair a fairly trivial crack in a carbon fiber frame-set. The seat-stay was still very stiff. Wrapping it with a couple layers of carbon fiber cloth and soaking that cloth with epoxy resin should make that seat-stay as strong as new. I spent $30 on Amazon and got a small roll of carbon fiber cloth and and some small bottles of resin and hardener.

The epoxy repair went very well. I could have done a lot of sanding and some additional epoxy work to make the repair look pretty, but the sanding would have weakened the area by cutting into some of the carbon fiber, and the additional epoxy would have added weight with no increase in strength. So my repair looks like a repair. Big deal!

Here is a picture of the cracked area before the repair:

To begin riding the bike again, I needed to replace multiple links on the bent chain, throw away a badly bent front derailleur, straighten the bent rear derailleur cage, piece together some bar tape, and salvage a pair of old SPD pedals. The pedals should look like this:

But the bolt holding on the spring mechanism of one pedal had snapped.  Even though I couldn't figure out a way to repair the pedal, I thought it just might work without the rear portion, functioning like an old-fashioned toe-clip. 

Sliding the tip of the cleat under the metal toe-retainer should hold one's foot in position fairly well, as long as the force of the pedal stroke is forward and down. Sad fact is, I'm not a sprinter and I generally don't pull up on my pedals.

So I built the bike up.

Because there is no front derailleur, it's a 10-speed bike with a 34-tooth chain-ring and an 11x28 cassette. How big a deal is it to have only a 34 up front? In hill country it's not a big deal at all. At a cadence of 90 rpm, the bike will go about 21.8 mph on flat ground. But 20 mph is the fastest time trial speed I've ever been able to maintain. I'm sure I'd like a 50-tooth chain-ring if I spent a lot of time "sucking wheel" on group rides. I don't.  I almost always ride alone or side-by-side with a single friend. I really don't like holding the wheel and staring at someone else's butt for long periods of time! When the road slopes downhill, I now stop pedaling and get into an aero tuck; the bike accelerates to nearly the same speed I could maintain by pedaling in the 50-tooth chain-ring.

So here are my three conclusions from this experimental effort:

1. A modern road bike can be changed to a 10-speed with almost no loss in its capability. In fact, the single chain-ring means lighter weight, greater simplicity, and more reliability. Dropping a chain is now almost impossible, as is breaking a derailleur hanger. Fussy front derailleur adjustments are a thing of the past.

2. Carbon fiber frames can be repaired easily -- at least if the cracks are minor and the frame is still intact and strong. Even so, I would not attempt to repair a cracked fork; if that repair failed, the crash would send me sailing into a forward endo.

3. Modern clipless pedals should be adjusted so that they release very easily. Hardly anyone pulls up hard on the pedals. There is no need for those embarrassing falls when one can't unclip quickly enough to put a foot on the ground. 

Update 5/31/202: With a couple of minor changes, my bike of broken parts has once again become my main ride. First, I put on a different set of clipless pedals to improve my connection to the bike. But I do have the springs on the pedals adjusted so that they release very easily. Second, I replaced the 34-tooth chainring with a 39-tooth ring. This will allow me to crank it up to 25 mph on the flats. I'm also using the superlight American Classic Sprint 350 front wheel that originally came with my Motobecane Le Champion SL. If I remove the unnecessary 50-tooth chainring, I'll save another ounce or two on what now seems to me to be a very sweet setup!

Sunday, August 18, 2019

DIY Red Cedar Selfbow


Living on top of a limestone glade in the Ozarks, I naturally have lots of hearty little Red Cedar trees trying to eke out survival. In a couple of places there are thickets where the saplings crowd each other to death . . . and that requires some periodic pruning on my part. Some have to die so that others can thrive.

Often as I'm selecting saplings to remove, I marvel at their beauty and wonder what I can possibly do with them. Usually I chop them into short chunks to use as kindling in my wood stove, but last year I saved a few long, straight trunks thinking I might be able to find something to do with them. The best of them were about 10-feet long with a diameter of 2 or 3 inches -- not big enough for a rail fence or a post, but surely good for something!

I let them dry in my covered woodshed for a few months while I thought things over, and I eventually decided that I might be able to use the straightest one to make an experimental longbow. As it happens, while red cedar is fairly rot-resistant, it is the favored food of some insects. By the time I started making my bow, it was being nibbled and cored. But that was only one of its deficiencies. Red Cedar has fairly straight grain and splits easily, but it is typically riddled with knots left by all the small branches of the sapling. So I started my project with a pretty ordinary (albeit fairly straight) stick of wood.

Still, this was only my first attempt at making a longbow and I saw little downside in the risk of failure. I assembled my tools, watched some YouTube videos, and began construction.

The Tools

It turns out, you can make a longbow with almost any sharp tool -- an ax, a machete, or even a chef's knife. And, yes, one such tool will probably suffice, but it's helpful to have some others -- a rasp, a chisel, a plane, a spokeshave, sandpaper. Any combination of those will do.

The Technique 

Start  with the best 8-foot section of your sapling. Remove the bark with your tool of choice (let's say, a machete). Sight down your sapling and decide which surface you'd like to have as the back of your bow. You want your bow as straight and as smooth as possible, so select the surface that comes closest to perfection. Draw a line across the diameter of the sapling at one end and begin splitting the sapling. Don't cut right on the line you have drawn. Instead give yourself a safety margin of about 1/4" or more.

Use a block of wood or a mallet to pound the machete into the wood and begin the split. Watch very carefully to be sure the cut isn't going deeply into your safety margin. If you find that your blade is veering toward the center, you can try splitting from the other end, or you can pull out your blade and start over with an even wider safety margin. Keep pounding and developing the split. It may gradually trail up to the surface or toward the surface. If it does so, you'll need start another split where it began to bend toward the surface and take off another thin slice.  You may even find that you need to do some chopping to remove wood, but eventually you'll end up with a nearly bisected 8-foot cylinder of cedar and a big pile of cedar chips.

The outer, rounded surface will be the back of your bow. You want to leave the fibers of the back continuous for the length of the bow, so be tolerant of irregularities -- though a certain amount of chopping and smoothing around the knots made sense to me.

The flatter, heartwood side is where you will now do most of your work. Chop, chisel, and sand until the stave looks symmetrical and vaguely like something that could become a bow. At this point you should begin "tillering" your 8-foot stave. In tillering you tie a long piece of bowstring (or even paracord) to each end of the bow. No need to bend the bow to string it at this early stage. Now you lay the bow horizontally into a tillering bracket that you have screwed into a vertical post or garage stud about five feet from the floor. The tillering bracket can be made of 1x4 scrap wood. It should be about 8" wide, 2" deep, with sides at least 2" high. The idea is to have a bracket to hold your bow while you draw the bowstring down toward the floor. Attach an eye-bolt to the stud about two feet from the floor. Tie a long strand of paracord to the center of your bowstring, thread the end down through the eyebolt, and stand ten feet or more away.

Now you can begin to gently bend your stave. Part of the goal is to make the fibers on the back of the bow "accustomed" to being bent and not broken, but the more important goal is to watch the bend to see -- and even mark -- where you need to remove wood from the stave so that each end of the bow is equal and the bend is smoothly symmetrical. Remove wood from the heart-side of the bow in places where it is too stiff and check the bend again. Repeat as many times as necessary.

As your bow begins to bend more smoothly, you'll need to cut it down to length. I'm 6' 3" tall, with long arms. I made my bow 7' long. I recommend adding 9 or 10 inches to your height and making that the length of your bow, recognizing that you can later reduce the length even more if that seems advisable. Having cut it to length, add nocks for stringing the bow 1" from each end. The nocks are cut at about a 45-degree angle and can best be made with a small round file.

Now you should begin stringing the bow properly and tillering it with care. The tillering process is what tells you how much wood to remove and where to remove it, but perhaps the dimensions of my finished bow can be useful as a rough set of guidelines for your project.

Longbow Measurements

          • Overall length -- 84"
          • Width at middle -- 1 1/2"
          • Width at ends -- 1 1/4"
          • Depth at middle -- 7/8"
          • Depth at ends -- 5/8"
          • Length of handle -- 7"
          • 45-degree nocks for string -- 1" from each end
The handle can be made from any nice hunk of cedar from the first splitting or from shortening the overall length of the bow. To attach it, smooth an 8" surface at the halfway point along the length of the bow and then smooth the flat surface of the handle so that the two pieces mate as perfectly as possible. Smear on some wood glue and clamp the handle together for 48-hours. The handle makes it more comfortable to draw the bow fully, but it also significantly increases the draw weight.

Once your bow is bending well and shooting well, you can finish it to preserve the wood from dirt. I varnished mine, but Tung oil would also work. An epoxy finish (with UV protection) would also be a good choice. You could even wrap the bow with fiberglass cloth before using epoxy; that would add significantly to its strength and draw weight. Your finished bow will be a unique piece of personal craftsmanship that should give you years of shooting enjoyment.

(Click on any of these images to enlarge them.)


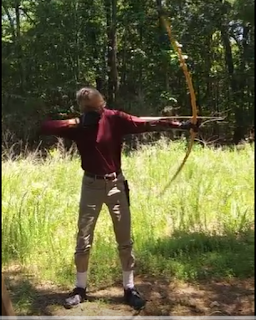
Click here for a 30-second video of the bow being shot. The photo below shows the instant just after the string has been released. Look closely and you can see the arrow flexing as it bends around the shaft of the bow in the "archer's paradox."


Recommended YouTube Viewing

Making a Longbow from an Ash sapling in a day -- Mick Grewcock nicely illustrates all the steps I took in making my bow.
Making a Red Cedar Longbow -- This video clearly shows how to make a Red Cedar longbow from a large sapling with just a machete. Clay Hayes strongly emphasizes backing the bow. I have not found that necessary -- perhaps because my smaller sapling allows preservation of more continuous sheath fibers and my bow is quite a bit longer and wider than his. I'll add that mine is less refined and easier to make, but it still works very well.
Making a Longbow with just an Ax -- This nice video illustrates what happens if the bow is too short and the limbs are too thin.
Making a Bowstring. Why buy expensive bowstrings when you can easily make your own?

Sunday, June 2, 2019

RIP Nashbar Carbon CR4


Just over four years ago I wrote a glowing review of my then-new Nashbar CR4 carbon road bike. It has been a very good bike, but after 13,606 miles I am putting it on the shelf. I still stand by the statements I made about the bike in that review, but I can now add that the frame has one fatal flaw -- a flaw that, sadly, might be quite common on newer road bikes.

The CR4 has a "replaceable" derailleur hanger. And that part is made out of light-weight aluminum. I am not a powerhouse sprinter by any means, yet I have broken that hanger three times. One time there was little damage -- just the cost of replacing the hanger. The next time it broke when I was pedaling up a hill and the force of the pedal stroke bent the rear derailleur. The third time I was cruising downhill at more than 20 mph. The hanger broke. The rear derailleur swung down into my spokes. And I was left with a broken derailleur hanger, a wrecked derailleur, four broken spokes on my rear wheel, and (perhaps) a broken chain stay on the carbon frame! All this -- plus coming close to a very dangerous crash -- because the bike is specced with an aluminum derailleur hanger! Please! I understand that a broken hanger might be better than a broken frame, but in this case the broken hanger probably caused the broken frame as well as considerable additional damage.

Not all innovations are improvements. Give me a strong derailleur hanger. Maybe something steel!