Saturday, November 28, 2015

Building a Chesapeake Light Craft Northeaster Dory -- Odds and Ends

The Northeaster Dory is a carefully thought-out and well-designed kit, but you really do need to build every part of it, and some of the inconspicuous things are remarkably time-consuming.

For instance, flotation. Nobody likes to think about capsizing their boat, but suppose it happens? This is a wooden boat so it would float -- even when swamped -- but with all the fiberglass it would float very low in the water. So blocks of flotation are necessary to displace enough water to get the gunwales up enough to allow you to begin bailing the boat. But where can the flotation go? The only option in an open boat like this one is to tuck it neatly under the thwarts. And how do you make neat, inconspicuous foam blocks to tuck under the thwarts? You go to your local Home Depot and pick up a couple of 4' x 8' sheets of pink or blue 3/4" foam insulation (thicker if you can find it). Then you cut it into 6"-wide strips, glue five strips together to make a block 4 1/4" thick, trace the shape of the bulkhead onto the block, cut it out, sand it smooth, give it several coats of fiberglass, spray paint it matte-black, and glue it to the underside of one of the thwarts. Repeat five more times!

A flotation block -- glued and clamped 
The daggerboard, too, is a bit of a job. Like everything else, it comes in the kit as a bunch of bits and pieces. The basic shape is there . . . but the pieces must be glued together. And then the real shaping begins. All of the rough edges (now made rock-hard by the epoxy glue) must be sanded smooth, including the awkward inside of the handle. To make the daggerboard hydrodynamic, it is shaped a bit like a wing -- bullet-shaped on the leading edge and blade-shaped on the trailing edge. And then it, too, needs several coats of epoxy.

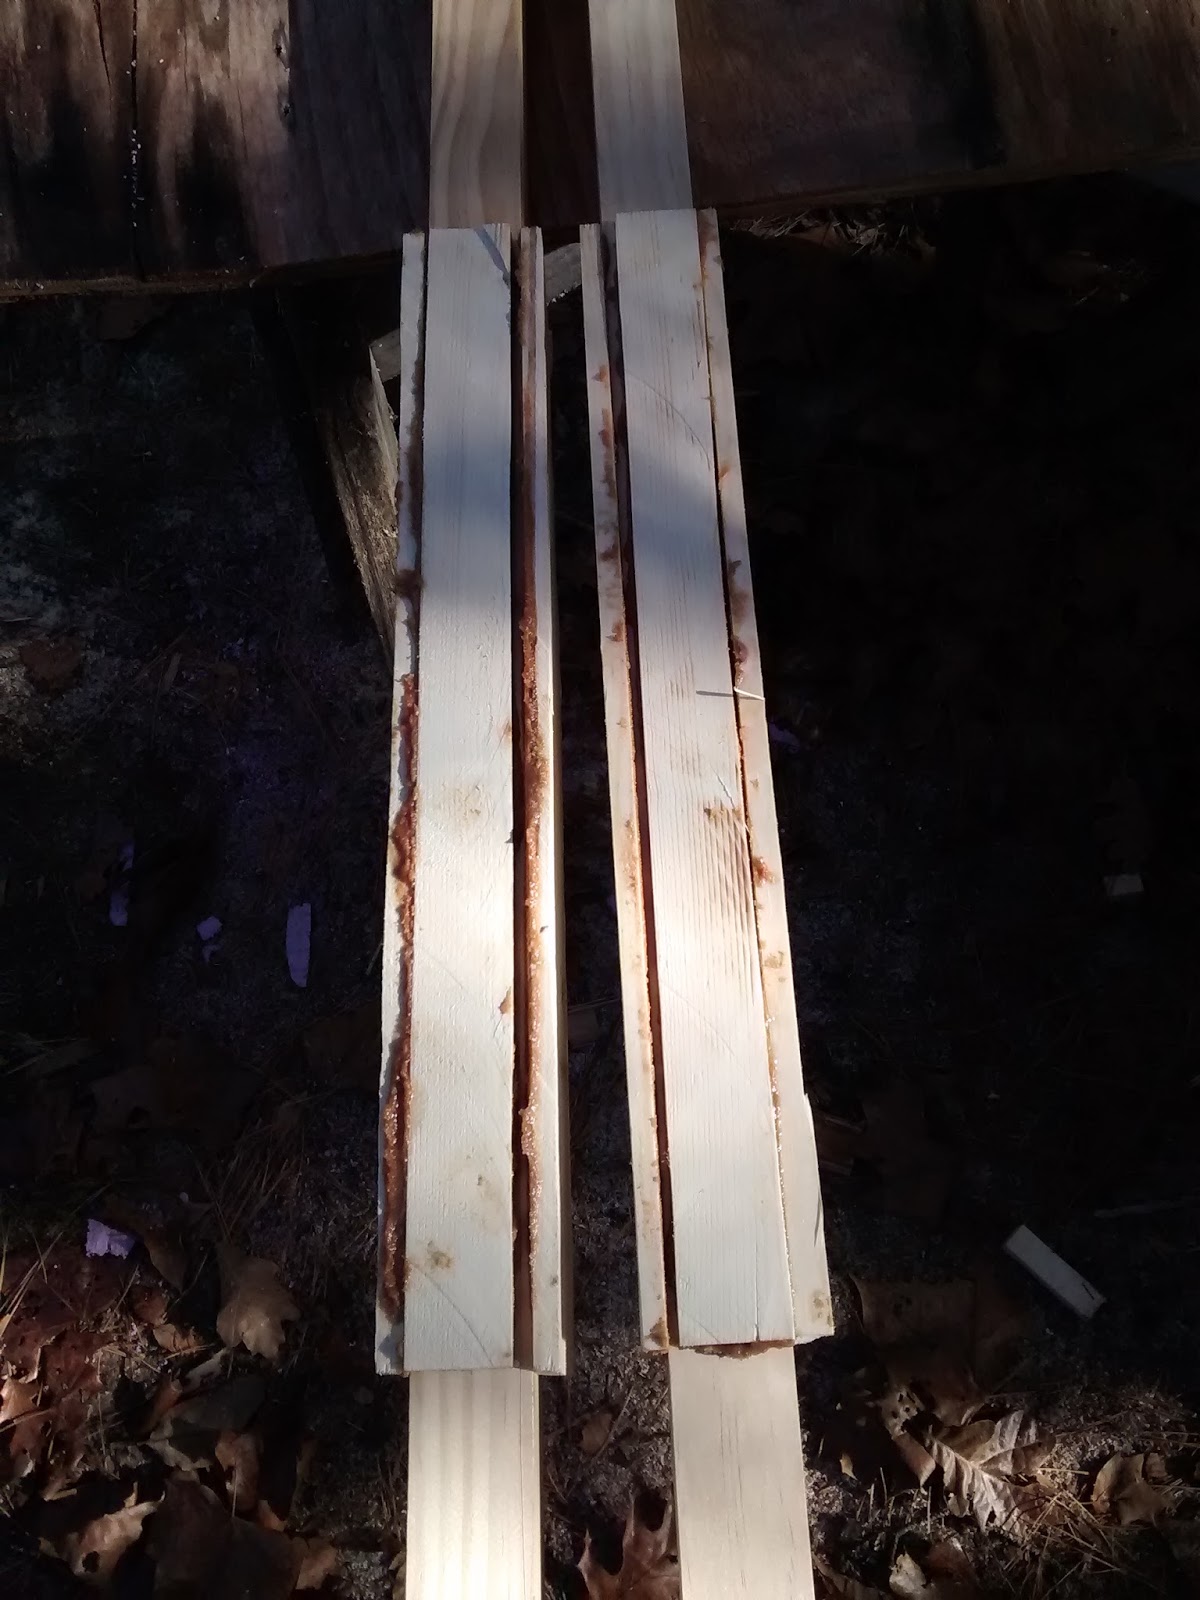
The daggerboard -- glued, but still rough

The daggerboard -- shaped, faired, and sanded

At this point the boat was essentially complete, but the interior had only two coats of epoxy and felt a little like sandpaper when you ran your hand over it. So my next task was to sand it all very smooth (without ever sanding through the epoxy to the plywood beneath. Then I needed to deal with the vagaries of November weather. I waited for a warm 60-ish day to apply the epoxy, but epoxy takes at least 24-hours to harden and it was going to get into the low 40's at night -- a temperature that can bring the curing process to a halt. So we picked up some shop lights in town and bought some of the few 100-watt incandescent bulbs remaining on the market. This allowed me to rig up a gentle heat-lamp system to keep the boat warm at light. (Such loving, tender care I give!)

A Dory -- heated and tucked-in for the night
Of course, it wouldn't do to have a boat so beautiful dragged to the water on the rusty old flatbed trailer I use for hauling trash and firewood. No, such a lovely boat needs its own all-aluminum trailer (which probably could have been silver-plated for the price I paid!). And, of course, the trailer just had to arrive on the UPS truck as a kit! It took two full days to assemble, and the sparse, baffling instructions led to some under-the-breath muttering and renewed appreciation for the truly wonderful instruction book for the Dory itself.

Trailex parts
Trailex assembled

The finish work of sanding and varnishing all parts of the boat will undoubtedly take time and possibly much of the winter (since I need 60-degree days for varnishing), but the boat is now ready to be used. Yesterday afternoon I was working in the open garage on some fiddly little task when the FedEx truck pulled up. As the driver got out, he exclaimed, "You're building a boat! . . . Wow! It's beautiful! . . . How many of these have you made?"

I took a certain quiet pride in confessing that it was my very first wooden boat.


Saturday, November 21, 2015

Building A Chesapeake Light Craft Northeaster Dory -- Oars, part 2

Oar Blade
Making a set of oars for the Dory has been the most ambitious wood-working element of the entire project. I have been working from the general set of plans I mentioned in my last post about oars, but I have freely adapted those plans based on the lumber available to me in my local Home Depot. In making these oars I am taking a calculated risk, but the costs are not high: a few dollars for lumber and a lot of time for construction.

As I mentioned earlier, the shafts of the oars are formed from #1 pine 2x2's. Here is a picture showing how I planned to shape the handles:

Oar handles

If you look closely at that picture, you can see that I have already attached and begun to shape the wooden jackets that serve as counterweights. Here is a picture of those counterweights at an earlier stage, showing just how rough they were in the beginning:
Counterweights

In a previous post I showed how I clamped these oars together and created the rough, rectangular shapes that I would have to hew to shape with my new spokeshave. After a lot of shaving and sanding, I was able to shape the first oar to look like this:

Shaped Oar

This was just the first of the two oars and it wasn't really finished. The two wings of the blade were attached by only a bit of thickened epoxy, and in places I could see right through the crack. Were I to row hard with such oars, I'd be likely to break off the attachments. So my next task was to create sizable fillets along both sides of these connections. I also needed to save some weight by thinning the blade and the neck of the loom. And, of course, I needed to make the second oar.

All of that has now happened. Both oars are ready for a final light sanding and then some epoxy followed by varnish. I'm still not sure they won't break with hard use, but I'm confident enough to push onward.

Finished Oars

If you zoom way in on the oars in the photo, you can see the fillets and the fairly thin shape of the blades. I think I'll still bore a hole into the center of the handles so that I can insert some heavy sinkers and improve the balance of the oars. They are not perfect, but they should be fairly attractive and very useful.

Update 2/16/2022 I've now used the oars for aver seven years and they are still as good as new. I did insert lead sinkers into holes bored into the handles and the balance is good. The oars are totally suitable and still look like new.


Thursday, November 12, 2015

Building a Chesapeake Light Craft Northeaster Dory -- A Boat that Would Float!


I have been working very hard on my Dory for the past few days, and I now have a boat that would definitely float! The exterior has three coats of fiberglass and is relatively smooth. The interior has only two coats and needs a thorough (smooth) sanding before I apply the third coat, but even as it is, it is a nice boat. The thwarts are covered with fiberglass in varying amounts. The foam flotation blocks have all been cut, glued, smoothed, sanded, and fiberglassed with a first coat; they will fit snugly under the thwarts and help out a little if I ever capsize the boat while under sail. The daggerboard trunk is nearly ready for installation as is the mast step. Those will be frightening elements to install since both require drilling holes in the bottom . . .and the daggerboard well also requires cutting the opening for the daggerboard. The rudder is coated with fiberglass, but still needs a lot of sanding and some more fiberglass. Only the daggerboard and the oars are still at relatively early stages -- though both are at least recognizably under construction.

The end is not yet in sight, of course. Only now am I near the stage of adding the finish coats of varnish and paint. That process will require sanding and painting, sanding and painting, sanding and painting . . . . You get the idea. But maybe the boat can still take a little dip in the lake before Christmas.

Building a Chesapeake Light Craft Northeaster Dory -- Making Oars


What good is a rowboat without oars? But it turns out that oars in the lengths I need are fairly expensive and perhaps not as good as homemade oars. What I need are two sets of 8’-foot oars. They should be lightweight and relatively easy to make. Most boat builders seem to lean toward oars based on Pete Culler’s designs, and the best web page I could find on making such oars is Don Kurylko’s discussion of his boat project (though you have to scroll way down to see the oars):


For design purposes, the relevant sketch is this one:
I went to the local Home Depot and picked up enough good wood for a trial set of oars. I got lucky and found perfect #1 lumber -- 2 2x2x8 pieces and 1 1x4x8 piece. One 2x2 is used for the core of each oar. The 1x4 is used for both the blades and for the counterweights above the looms, according to the plan in the two drawings below:


Pattern for the Oar Blades
A 5' section of 1x4 is ripped down the middle, giving you two 1 x 1 3/4 planks. Each of these is then sawn on the diagonal, starting at the 2' mark and crossing to the 3' mark. This gives 4 blade pieces that will be glued to each side of the 2x2s.

The "counterweights" are just additional wood that will be in a "jacket" around each 2x2 above the pivot point of the oars. First, I cut off a 34 1/2" section from the remnant of the 1x4x8. Then I ripped it to create one 1 x 1 3/8 plank and one 1 x 2 1/8 plank, as indicated in the pattern below:
Pattern for the Oar Counterweights
The next step was tricky since I needed to rip the thickness of each of these one-inch boards (actually 3/4") in half to create two 3/8" boards. I did that by lightly clamping these 3/4" boards between a couple of sticks of 2" scrap lumber. That gave me a board wide enough so that I could rest the shoe of my circular saw flat while I ripped it in half. These 3/8" boards are not, of course, perfectly dimensioned, but I'll be shaving them down with my plane and my spokeshave anyway.

Finally I screwed some temporary rails onto my plywood-decked flat-bed trailer so that I could clamp the blade pieces to the shafts, as shown here:


With the clamps removed, I have a clunky set of wooden oars, ready to be jacketed and then gradually shaved and sanded into shape. Only time will tell if they work.


Tuesday, November 3, 2015

Building a Chesapeake Light Craft Northeaster Dory --Fiberglassing the Hull

It has been almost two weeks since I posted an update on building the Dory. I have taken a little time off, but most days I do put in several hours of work. First, I sanded the entire bottom of the boat and all side panels, before recruiting Sue to help me put the fiberglass cloth on the bottom and lowest side panel. That was a little nerve-wracking because of the almost inevitable drips, spills, and sags, but on the whole it went well. 

The next day I spent the morning carefully sanding the entire bottom of the boat again with both 80-grit and 120-grit sandpaper. I also did quite a bit of hand sanding, trying to get everything reasonably smooth. By mid-afternoon I was ready to appply first full coat of fiberglass. As suggested in the manual, I used a roller to spread a very thin coat of fiberglass. As a result there was no problem with drips, but I’m not absolutely positive about having covered every inch of wood. The roller does leave little bubbles so I used a foam brush to tip them out. To my eye the coat looked smooth -- though one could still see the places beneath this coat where previous drips and smears had been. The boat looked quite acceptable from about 10 - 15 feet, and I wanted it to look much better by the time I finished the third coat. My plan was to sand with 100-grit paper between the second and the third coats.  

After applying the second coat of epoxy covering the entire bottom of the hull, I was a bit concerned that the surface was not very smooth. Bits of dust turned into hard fiberglass speckles and in places even the grain of the plywood itself absorbed fiberglass and stood on end almost like specks of sand. I decided to give this a few days to dry and then proceed with a thorough sanding, but I was beginning to doubt that I would ever get to a smooth mirror finish. From a distance the hull looked just fine, but it felt like sandpaper to rub your hand across it.

Fiberglass takes about five days to harden fully and be ready for a thorough sanding. In the interim I plugged away on other pieces -- the skeg, the rudder, the daggerboard, the mast step, the daggerboard well, the mast, and the spars. Attaching the skeg required having Sue hold it centered and square, while I drilled holes from the bottom. It was then glued and strengthened with fillets. Despite our best efforts, there seemed to be a slight curve when sighting along the skeg from the stern toward the bow, so I had to fix that with some aggressive work with the belt sander. 

The rudder, too, was a challenge. Shaping it was not too difficult as it just requires bullet curves on its edges. But the the yoke was a problem. It took some sanding, rasping, and chiseling to get it to fit, and then a small shim to make it snug. I propped it up and put a coat of fiberglass on as much as I could, And then I made my mistake. Instead of waiting for that fiberglass to dry, I went right on to mix thickened glue for the sturdy fillets that hold it together. Unfortunately the fiberglass under the fillets was very slippery and fashioning the fillets turned into a big mess. Patience and perseverance prevailed, and eventually I ended up with adequate fillets.

Daggerboard well, rudder, and mast step

The mast and spars have been thoroughly sanded and are almost ready for varnish. (I still need to drill holes in them.) And I am nearly ready to glue together the mast foot and the daggerboard well. 

The thwarts were first glued together and then sanded smooth on the pretty side (which will be up). I bought a spokeshave and gradually learned how to use it while creating the chamfers on the edges of the thwarts. The spokeshave creates long curlicues of shavings . . . ideal for "little Orphan Annie" curls on a corn doll!

Spokeshave and Thwart
Fiberglassed thwarts

With the fiberglass on the bottom fully dry I was ready for sanding. First I spent a couple of hours using the paint scraper to scrape all the rough spots and drips on the bottom. I created some pretty good piles of fiberglass in this process, but it did make the hull much smoother. Unfortunately, the scraping also put a few minor scratches all the way into the fiberglass cloth.

A full day of sanding using both the orbital sander and hand sanding was necessary to smooth everything to my satisfaction (though I did sand all the way down to bare wood in a few spots). Then I spent about a hour sweeping and vacuuming the garage to get rid of dust -- clouds and billows of dust!

Finally, I was ready to apply the first of (I think) two thin coats of finish fiberglass. I used a chip brush to slather on the fiberglass, a paint roller to spread it into a thin coat, and the chip brush once again to smooth out the bubbles. It was a painstaking and slow process, but the end result is a very satisfactory fiberglass coat. In most places it is mirror smooth, marred only by occasional specks of dust and one unfortunate fly. I think the finish is smooth enough that I tempted to leave the bottom of the boat "bright." It's that good! (At least to my untutored and uncritical eye!)

Fiberglassed Hull
Close-up of the fly in the fiberglass